Sunday, October 20, 2024

Fix Microsoft Defender Antivirus Offline Scan

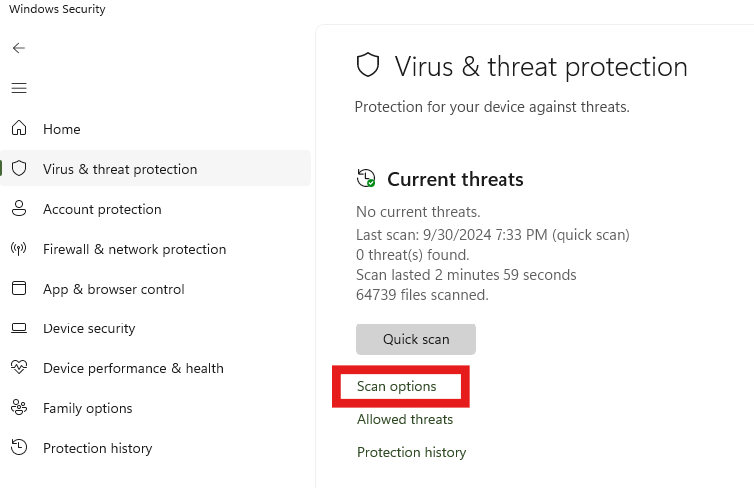
Windows 10 and later has "Microsoft Defender Antivirus Offline Scan", which can remove some malware that cannot be removed without restarting Windows. First, you click on the "Scan Options":


Then you select "Microsoft Defender Antivirus (offline scan)", and click "Scan now":


Windows will then prompt you to confirm, and restart Windows.

But after migrating Windows to a larger SSD, somehow I lost the recovery partition on my boot drive, and after getting prompted to restart Windows, Windows does not actually restart.

Then I found online that when the recovery partition is not present, this feature will not work. So I started to restore the recovery partition on my boot drive.

First I ran "reagentc /info" on the command line, and confirmed that "Windows RE" was disabled:

reagentc /info

Then I confirmed that "Windows RE" could not be simply enabled by running "reagentc /enable":

reagentc /enable

After that, I started to re-create the recovery partition.

1. In the Windows Disk Management tool, I shrank the main Windows partition to make room at the end of the disk to create a new partition:


The partition size was set to 1024MB, or 1GB. A simple volume was created, and a drive letter "R" was temporarily assigned.  Then I create the directory "R:\Recovery\WindowsRE".

2. I mounted Windows installation iso file as drive "F". I then used the following command to list all the Windows images available:

    dism /Get-WimInfo /WimFile:F:\sources\install.wim

I then picked the index in the result list that matched my installation, created a directory "C:\Mount", and then ran

  dism /Mount-Wim /WimFile:F:\sources\install.wim /Index:<IndexNumber> /MountDir:C:\Mount /ReadOnly

3. I then copied the hidden, protected operating system file "C:\Mount\Windows\System32\Recovery\Winre.wim" into "R:\Recovery\WindowsRE" as well as "C:\Windows\System32\Recovery".

4. I then unmounted the image: 

   dism /Unmount-Wim /MountDir:C:\Mount /Discard

5. Then I ran the following:

   reagentc /setreimage /path R:\Recovery\WindowsRE
   reagentc /enable

6. At this point, Windows RE has been enabled:


7. The drive letter "R" was removed.

8. Finally, to turn the new partition into a recovery partition, I used "diskpart":

  diskpart
  list disk
  select disk <DiskNumber>  (replace <DiskNumber> with the number of your disk)
  list partition
  select partition <PartitionNumber>  (replace <PartitionNumber> with the number of the recovery partition)
  set id=27 override ("set id=de94bba4-06d1-4d40-a16a-bfd50179d6ac override" for GPT drive)

After that, the "Microsoft Defender Antivirus Offline Scan" is working again.

Disclaimer and Caution: Be very careful with "diskpart" and the Windows Disk Management tool! Serious data loss could occur if you execute anything wrong!


Saturday, January 20, 2024

Proof That (a^2+b^2)/(ab+1) Is a Square When It is an Integer

Let a, b be positive integers. When 

k = a2 + b2
ab + 1

is an integer, it is a square.

Proof:

We will refer to this as Equation (*) hereafter.

We will first prove the trivial case where a = b. If a = b, this becomes

k = 2a2
a2 + 1
or

k = 2
1 + 1/(a2)

Because a > 0, the denominator is greater than 1, so k < 2. Since k is a positive integer, k can only be 1. This means that a = 1. Since a = b,  b = 1. The statement is trivially true. Conversely, if k = 1, we have

a2 + b2 = ab + 1

(a − b)2 = 1 − ab

1 − ab  ≥  0

ab  ≤  1

which can be true only if a = 1, b = 1.

To further simplify the proof, we can exclude the special case a > b = 1, and k > 1 as well. When b = 1, we have
k = a2 + 1 = a + 1 − 2a
a + 1 a + 1
This means that 2a is divisible by a + 1. In other words, 2a = m (a + 1), (2 − m)a = m for some positive integer m. But from 2 − m > 0 we conclude that 2 > m, m = 1, so 2a = a + 1, and a = 1, k = 1 as well.

Therefore, without losing generality, we can assume that a > b > 1, and k > 1.

Multiply both sides of Equation (*) by b, we have

a2b + b3 = kb
ab + 1

Perform long division by (ab + 1), we get:

(ab + 1 − 1)a + b3 = kb
ab + 1

(ab + 1)a + b3 − a = kb
ab + 1

a + b3 − a = kb
ab + 1
"Move" a to the right:
b3 − a = kb − a
ab + 1

This leads to

b3 − a = (kb − a)(ab + 1)


There are three possible cases: 1. (kb − a) > 0, 2. (kb − a) < 0, and 3. (kb − a) = 0.

Case 3 means that b3 − a = 0, a = b3. Substitute this into Equation (*), we get k = b2, which proves the original statement to be true. So we only need to prove that Case 1 and Case 2 are either not possible or yield a k = c2 for some integer c.

Case 2 is not possible because if (kb − a) < 0, we have

b3 − a = (kb − a)(ab + 1) < 0

a − b3 = (a − kb)(ab + 1) > 0

But (a − kb) > 0 means that (a − kb) ≥ 1 since a, k, and b are all integers. So

a − b3  ≥  ab + 1

a − b3 > ab

This contradicts the fact that b > 1. So case 2 is not possible.

Case 1 is complicated. From (kb − a) > 0, (ab + 1) > 0 we also get b3 − a > 0. This in turn would mean that (kb − a) < b, because otherwise we would have

b3 − a = (kb − a)(ab + 1) ≥ b(ab + 1) > bab > b3

which is not possible when a > 0. Therefore, combine (kb − a) < b and kb > a, we get that (k − 1)b < a < kb, or

c = kb − a, where 0 < c < b.

Substitute a = kb − c into Equation (*), we have

(kb − c)2 + b2 = k((kb − c)b + 1)

(k2 + 1)b2 − 2kcb + c2 = k2b2 − kbc + k

b2 − kcb + c2 − k = 0

k = c2 + b2
cb + 1

Please note that here the value of k is the same as the original, we have not re-defined k. Repeat the same argument above, we again have three possibilities. While kc − b < 0 remains impossible, kc − b = 0 leads to k = c2, b = c3 (in which case the original assertion is true), and we are left with kc − b > 0, a recursive Case 1. However, this recursion cannot continue indefinitely, because a and b are both finite, yet at each step we have a > b > 1, and k > 1, and each time when we swap the roles of a and b, we are reducing the value of the smaller number by at least one.
In other words, Case 1 either does not hold, or can be reduced to k = c2 for some integer 0 < c < b.

QED


In this proof, I have produced a formula for generating a > b > 1, and k > 1 where Equation (*) holds.

Start with any b > 1, let a = b3, Equation (*) will be satisfied:

k = (b3)2 + b2 = b6 + b2 = b2(b4 + 1) = b2
b3b + 1 b4 + 1 b4 + 1

Let a1 = ka − b = b5 − b, we will have

k = a12 + a2 = b10 − 2b6 + b2 + b6 = b2(b8 − b4 + 1) = b2
a1a + 1 b8 − b4 + 1 b8 − b4 + 1

This process can be repeated indefinitely.
Saturday, October 21, 2023

Fixing GE WBSE3120B1WW Washing Machine

This is a twenty year old washing machine. Today it wanted to quit. Its motor no longer turned. although the water pump still worked, so water was getting drained when the time was up. 

I tried resetting the machine following the instructions found on YouTube: unplugged it, and then plugged it back in after one minute. Within 30 seconds after it was plugged back in, I opened and closed the lid six times, each time the magnetic switch clicked.

That did not help. So, I opened its front panel, and measured the voltages on the motor connector pins. I could not find a diagram for this washing machine online, but I did notice that the label on the motor says "115 V 60HZ 9.2/7.3A", so I knew that at least one of the pins on the connector should read 110 V.

None of the pins had 110 V. So, I knew that the motor was not getting adequate power. So I decided to trace the connection from the motor to the control panel.

After removing the control panel, I saw that there was a schematic diagram for this washing machine stored behind the control panel. Thanks, GE!

The diagram is too big to fix onto an 8 inch by 14 inch scanner surface. The following is the portion of the diagram on the motor connection:


The way GE marks the wire colors is that the first letter is the initial of the main color, and the second letter is the color of the stripe. For example, VW is a violet color wire with white stripe. RB is a red wire with a blue stripe. A wire with a solid color starts with the initial of the color, and then followed by the letter "X". For example, solid yellow would be YX, and solid red would be RX. "NX" is for solid navy blue. From this diagram, we can see that we should be getting 110 V on the navy wire "NX". 

The navy blue wire goes to a relay, as one would expect. The relay looks like this:


Of course, we now need to test this relay and see if it is indeed causing the problem. In fact, broken connections on M1, M3, or M7 could all cause the motor not to get power.

I removed the control board from its plastic housing, think that I might have to remove this relay from the circuit board for testing. But it turned out to be much simpler than I thought: the solder around one of its pins were burned away, and the pin did not appear to have contact with the circuit board. So, I cleaned the pin and re-soldered the pin to the circuit board.

I reinstalled the control panel back onto the washing machine. It is now working fine. 


Thursday, June 15, 2023

A Botched Attempt to Update TFS Server 2018 but with A Good Ending

 When updating TFS Server 2018, I left the "install search"  check box checked, and it led to a disaster. 

The "elastic search" service that TFS Server 2018 tried to install went berserk, and ate up a lot of RAM. So much so that another VM on the same host that ran the SQL server slowed down to a crawl. Then the TFS Server 2018 update failed with a message saying "TF255356: The following error occurred when configuring the Team Foundation databases: TF400711: Error occurred while executing servicing step 'Install Local Contribution Web Platform On Prem' for component Publish Extensions during FinishInstallUpdates". The reason in the log file: SQL timeout.

Not knowing what was going on in the background, I stopped the update, restored the database, and re-tried several times. Each time I got the same error.

I had to try to complete the update on a different machine, with a different SQL server. Since this was no longer a minor update, I upgraded the TFS Server 2018 to Azure DevOps Server 2022. Everything worked. Then I tried to move the SQL databases to the old SQL server. As soon as I completed the move, the TFS server, oh no, the Azure DevOps Server 2022, slowed down to a crawl again. 

It seemed that I had to leave the TFS server, oh wait, the Azure DevOps Server 2022, on the new hosts. So I started to clean up the old hosts and tried to remove any traces of the old TFS Server installations. There were several TFS Server folders in "C:\Program Files". I tried to delete them all, since they no longer show up on the installed applications list of Windows. But the TFS Server 2018 folder could not be deleted because it was in use by some running process. 

I sorted the running processes by memory usage, and saw that at the top there was a running process for "elastic search" that ate up a huge amount of RAM. Then I discovered that this process was from a Windows service installed by the TFS Server 2018. The service was "elasticsearch-service-x64". Its files were in the TFS Server 2018 folder. I stopped the service, and then removed it by running "sc delete elasticsearch-service-x64" on a admin command prompt. 

Now the host has regained all the RAM, everything is back to normal. The SQL server is no longer running at a snails pace. And the server is now the latest -- Azure DevOps Server 2022.0.1.


Saturday, May 27, 2023

OData Route 404 Error after Migrating from .NET Framework to .NET Core

 I have a global OData function in .NET Framework that uses a routing attribute:

[ODataRoute("GetSalesStats(SellerId={sellerId}, BuyerId={buyerId}, FromTime={fromTime}, ToTime={toTime})")]

This was working fine. Now with .NET 7 (.NET Core), I started using HttpGet attribute for routing:

[HttpGet("odata/GetSalesStats(SellerId={sellerId}, BuyerId={buyerId}, FromTime={fromTime}, ToTime={toTime})")]

This did not work. The difference is that the HttpGet attribute does not like the spaces after the commas. After removing the spaces, the following works fine:

[HttpGet("odata/GetSalesStats(SellerId={sellerId},BuyerId={buyerId},FromTime={fromTime}, ToTime={toTime})")]

Now I just need to go find all the spaces that I need to remove:-).

Update: When an entity has multiple key columns, the "OData Connected Service" tool for adding "Connected Service" in Visual Studio 2022 seems to add the key columns in alphabetical order. When you have routing attribute specified for an OData action, and the order of the parameters is different, you will get an HTTP 404 error as well. For example, for querying by primary key, you would have something like

[HttpGet("odata/UserData(PropertyName={propertyName},UserId={userId})")]

Even though you would setup the UserId as the first key column and the PropertyName as the second key column, the generated OData client always sends in the PropertyName as the first parameter, and the UserId as the second parameter. If you specify them in the "wrong" order, you will get an HTTP 404 error for it.

Sunday, February 5, 2023

"IIS Web App Manage" Step on TFS Build/Release Server

When trying to deploy to an IIS server from a TFS Build/Release Server, I ran into an error at the step for "IIS Web App Manage". The error code was 0x80090016, and the message was "Failed to commit configuration changes". "Keyset does not exist".

I googled for these errors online. All I found was that the machine keys in the folder "C:\ProgramData\Microsoft\Crypto\RSA\MachineKeys" were corrupted, and needed to be re-created with "iissetup.exe /install SharedLibraries". 

BTW, the error code  0x80090016 means "Your computer's Trusted Platform Module has malfunctioned".

Well, I tried to run "iissetup.exe /install SharedLibraries" to fix the problem after backing up the affected files. But that did not work for me. In fact, I was getting "0x80070005" error after running "iissetup.exe /install SharedLibraries" even though new key files were generated.

It turned out that in my case, the key files were not the problem. The problem was that my VSTS Agent service was running in a domain user account that did not have administrator access. Once I granted the user administrator access, the TFS Release Server was able to complete the step just fine.


Sunday, November 13, 2022

Transfer Music Manually From iTunes to iPhone

 This seems to be a very simple task. But I did not figure out how to do it until recently. I found this article: https://www.lifewire.com/how-to-sync-your-itunes-music-library-to-the-iphone-2438724, and I was able to copy individual songs to my iPhone manually:


However, there are a couple of important issues with this choice though:
  1. You could lose all the songs that were on the iPhone but not in iTunes. That was what happened to me. When I realized that was what happened, and tried to restore my iPhone from my PC, I found that iTunes' PC backup contains only the latest. The songs on my iPhone that were not on the PC (I copied them to my iPhone from another PC  long time ago) are now gone.
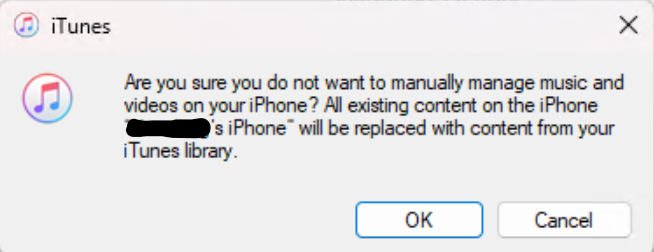
  2. You cannot turn off "Manually manage music and videos" without losing songs that only exist on your iPhone. When you try to turn it off, iTunes will prompt you with this dialog box:

Obviously, the situation is less than ideal. Ideally, we should be able to drag songs that only exist on the iPhone back to iTunes, and vice versa. You should not lose things on either side. 

Oh well. The price we pay for monopolies/authoritarianism.


Wednesday, October 19, 2022

FreeBSD 13.1 as a Guest OS in VMWare Workstation 16 Player

 Five years ago, I installed FreeBSD 11 in a VMWare 12 Player. I wrote about the experience here : http://programount.blogspot.com/2017/05/freebsd-11-as-guest-os-in-vmware.html. 

Recently, I decided to do an upgrade. I installed FreeBSD 13.1 in a VMWare 16 Player. I followed the same steps that I took last time, and completed the installation. After the completion, I logged into the GUI login screen, only to be greeted by a black screen with a mouse cursor.

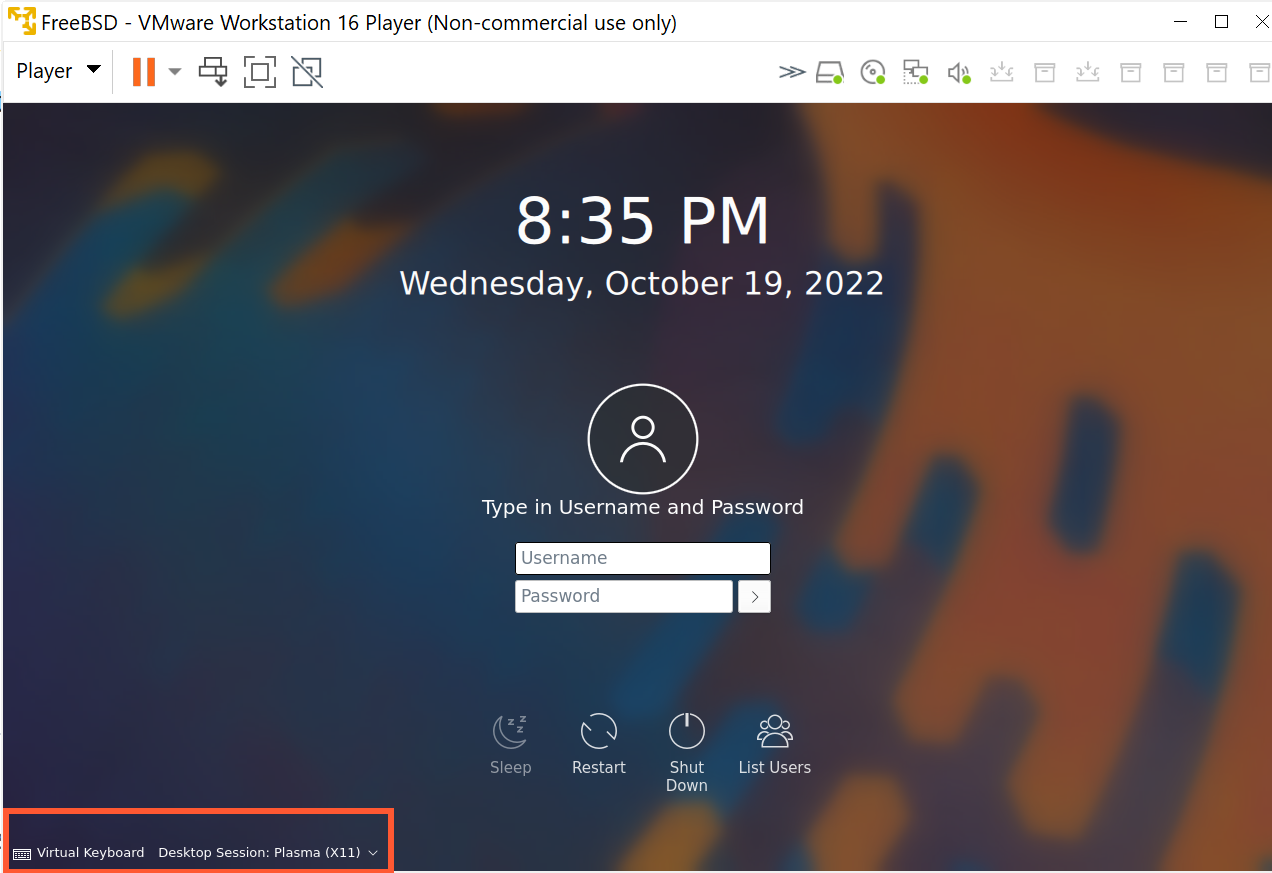
I spent a lot of time reading through many log files. Then by accident I noticed the drop down on the login screen:


The default selection was on "Desktop Session: Plasma (Wayland)". But I did not install "Wayland". In fact, at the site https://community.kde.org/FreeBSD/Setup, "Wayland" is crossed out. So I switched to "Desktop Session: Plasma (X11)", which is what I installed. After that, I logged in, and the Plasma 5 desktop is working.


Tuesday, October 26, 2021

Visual Studio 2019 Was "Unable to Locate .NET Core SDK"

Earlier today I noticed that Visual Studio 2019 (v16.11.5) could not load any of my .NET Core projects projects. When I tried to reload any of them, I got an error saying that "The project file cannot be opened. Unable to locate the .NET SDK" in the output pane, and then nothing happened.

A google search yielded suggestions saying that the version 2.x.xxx .NET Core SDK needed to be installed. Some said that "C:\Program Files\dotnet\" needed to be part of the "PATH" environment variable. Another said that an old "global.json" file was the cause. While each of these solutions worked for some folks, none seemed to work for me. I ran "dotnet --info" on the command line, and this is what I saw:


"No SDKs were found." Then I noticed a comment about x86 version of dotnet at https://superuser.com/questions/1431833/visual-studio-2019-unable-to-locate-net-core-sdk/1441219. I realized that I was running the x86 version of dotnet. Of course, in hindsight, the "C:\Program Files (x86)" paths in the runtime locations should have been a clear indication of the problem. Then I tried running the 64 bit version:


Well, now a whole list of SDKs showed up. It turned out that the paths to both the x86 version of dotnet and the 64 bit dotnet were in my "PATH" environment variable, and the x86 version was listed first. I do not know which installer made this change, for the projects were working fine at one time. I removed the path to the x86 version of dotnet from the "PATH" environment variable, and now everything works fine.

One interesting side-note: Window 11 complained about the size of the "PATH" environment variable, saying that its length had exceeded 2048. I replaced some folder paths with environment variable references, and reduced the length to below 2048. I wondered: when installer apps increased the "PATH" environment variable length to beyond 2048, why did not Windows complain? Would Windows just ignore the part after the first 2048 characters? Or would Windows use the whole "PATH" environment variable, even though its length exceeded 2048, just because some installer app did this? It turns out that a "PATH" environment variable longer than 2048 can cause real problems: https://superuser.com/questions/355594/windows-7s-path-and-environment-variables-are-corrupted, at least for older versions of Windows. For Windows 10, there is a discussion here: https://stackoverflow.com/questions/34491244/environment-variable-is-too-large-on-windows-10. From the look of the error dialog box, this should apply to Windows 11 as well.


Saturday, June 19, 2021

Getting Rid of the Annoying Air Gaps Along the Edges of a Tempered Glass Screen Protector on a Cell Phone

Installing tempered glass screen protectors on cell phones always takes a lot of patience, and the results are usually less than ideal: dust particles under the tempered glass screen protectors can leave air bubbles around them. Repeatedly lifting the tempered glass screen protector to get rid of the dust particles can leave air gaps along the edges of the tempered glass screen protectors that would not go away.

I found two things that could help in such situations:

1. Install the tempered glass screen protectors in a large, thin new transparent plastic gap. Rubbing the plastic bag to introduce some static charges onto the bag would reduce the amount of dust particles floating in the bag. By placing all necessary components needed for the installation into the bag gently, you would have a less dusty environment for installation.

2. After the installation of a tempered glass screen protector, if you see air gaps along the edges of the tempered glass screen protector, you can use a cotton swab soaked with distilled water (but not dripping), and dab it along an air gap to get the water into the gap. Once the water is in the air gap, press the tempered glass along the area where the air gap was to squeeze out the water. Clean off any water that you see. The air gap will be gone for good.

Monday, January 27, 2020

Windows 10 Disk Is Full but Windows Explorer Cannot Account for the Missing Space

Recently my laptop was running out of disk space. This laptop has an SSD of 512 GB size. Windows explorer showed that it had 0 byte left. But when I right clicked on the C drive and opened its "Properties" dialog box, The total used disk space was much less:


This was very strange. If I removed some files to make room, the free space would be gone automatically little by little, as time goes by.

Thanks to a free software called "WizTree" (https://antibody-software.com/web/software/software/wiztree-finds-the-files-and-folders-using-the-most-disk-space-on-your-hard-drive/), the culprit was identified very quickly: it was the Microsoft SQL Server Developer Edition. When the SQL Server is installed with "PolyBase Query Service for External Data", and when the TCP/IP protocol is not enabled for the SQL server, it will write more and more contents into its dump files  in the folder "C:\Program Files\Microsoft SQL Server\MSSQL15.MSSQLSERVER\MSSQL\Log\PolyBase\dump"(https://nielsberglund.com/2019/11/20/fix-polybase-in-sql-server-2019-developers-edition/).

However, when I clicked on the folder "C:\Program Files\Microsoft SQL Server\MSSQL15.MSSQLSERVER\MSSQL\Log" in Windows Explorer, or when I tried to open this folder by simply pasting it into the address box of an Explorer window, I got no response at all, as if I did nothing.

It turns out that the Microsoft SQL Server installer does not specify an owner for this folder. Apparently that was why its size was not included in the total size of all the files on my C drive!

Because the folder "C:\Program Files\Microsoft SQL Server\MSSQL15.MSSQLSERVER\MSSQL" is owned by "SYSTEM", I changed the owner of "C:\Program Files\Microsoft SQL Server\MSSQL15.MSSQLSERVER\MSSQL\Log" to SYSTEM as well. Once I did that, I was able to get into "C:\Program Files\Microsoft SQL Server\MSSQL15.MSSQLSERVER\MSSQL\Log" just like a normal folder.

I enabled the TCP/IP protocol on the SQL Server, restarted the PC, and then I removed all of the dump files and log files in the folder "C:\Program Files\Microsoft SQL Server\MSSQL15.MSSQLSERVER\MSSQL\Log\PolyBase\dump". Now the free space on my C drive is no longer disappearing on me anymore.


Wednesday, December 11, 2019

Error: "Microsoft.Net.Compilers is only supported on MSBuild v16.3 and above"

After installing "Microsoft.Net.Compilers.3.4.0", I was getting errors when building ASP .NET projects in Visual Studio 2019:

"...\packages\Microsoft.Net.Compilers.3.4.0\build\Microsoft.Net.Compilers.props(14,5): Error : Microsoft.Net.Compilers is only supported on MSBuild v16.3 and above"

This is a bug in Microsoft.Net.Compilers.3.4.0. Someone at Microsoft made a change in the file "Microsoft.Net.Compilers.props" without understanding the different terms. The section in question is

<Target Name="ValidateMSBuildToolsVersion" Condition="'$(BuildingProject)' == 'true'">
 <!-- The new editorconfig support requires MSBuild version 16.3. --> 

 <Error Text="Microsoft.Net.Compilers is only supported on MSBuild v16.3 and above" Condition="'$(MSBuildToolsVersion)' &lt; '16.3'" />
</Target>

Please note that this section is named "ValidateMSBuildToolsVersion", not "ValidateMSBuildVersion". While the "MSBuildVersion" is 16.4 in the "C:\Program Files (x86)\Microsoft Visual Studio\2019\<editionnamehere>\MSBuild\$(MSBuildToolsVersion)\, MSBuildToolsVersion itself is not 16.4! In fact, it may not even be a number, if Visual Studio decides to use the "Current" version. That is why in the prior version of "Microsoft.Net.Compilers.props", the check looked like this:

<Target Name="ValidateMSBuildToolsVersion" Condition="'$(BuildingProject)' == 'true'">
  <Error Text="Microsoft.Net.Compilers is only supported on MSBuild v15.0 and above"
Condition="'$(MSBuildToolsVersion)' == '2.0' OR

 '$(MSBuildToolsVersion)' == '3.5' OR 
 '$(MSBuildToolsVersion)' == '4.0' OR 
 '$(MSBuildToolsVersion)' == '12.0' OR 
 '$(MSBuildToolsVersion)' == '14.0'" />
</Target>


Of course, the error text in the prior version is a little misleading as well: it referred to "MSBuild v15.0", not "MSBuild Tools v15.0".

Right now, the MSBuildToolsVersion is set to "15.0" when you create a new project in Visual Studio 2019. You can use a text editor to open the project file and verify that. If you migrated your project from an older version of Visual Studio, the number could be smaller than 15.0.

But Visual Studio 2019 does not necessarily use this number. If Visual Studio 2019 does not find what it is looking for in "C:\Program Files (x86)\Microsoft Visual Studio\2019\<editionnamehere>\MSBuild\$(MSBuildToolsVersion)\", it would automatically set MSBuildToolsVersion to "Current", and use the folder "C:\Program Files (x86)\Microsoft Visual Studio\2019\<editionnamehere>\MSBuild\Current\". That was why the prior version of "Microsoft.Net.Compilers.props" does not use "Condition="'$(MSBuildToolsVersion)' < '15.0'", since a numeric comparison would not work on "Current"!

So, for now, the fix is to change this section to

<Target Name="ValidateMSBuildToolsVersion" Condition="'$(BuildingProject)' == 'true'">  
 <Error Text="Microsoft.Net.Compilers is only supported on MSBuild Tools v15.0 and above"
Condition="'$(MSBuildToolsVersion)' == '2.0' OR 

 '$(MSBuildToolsVersion)' == '3.5' OR 
 '$(MSBuildToolsVersion)' == '4.0' OR 
 '$(MSBuildToolsVersion)' == '12.0' OR 
 '$(MSBuildToolsVersion)' == '14.0'" />
</Target>


Now I am able to use "Microsoft.Net.Compilers.3.4.0" without errors.

Tuesday, July 9, 2019

Ubuntu with 4.15 Kernel in VMWare Shows Blank Screen without Login Prompt

Today I upgraded my Ubuntu installation in VMWare Workstation 12 Player. After the upgrade, Ubuntu rebooted, but it showed only a blank screen without a login prompt.

It turns out that this is a known bug: https://bugs.launchpad.net/ubuntu/+source/linux/+bug/1832138. To fix this, I did the following:

1. Restarted the client VM and set keyboard input focus in the VM window by clicking the left mouse button in it.
2. Pressed the shift key while the VM was restarting.
3. Selected the 4.15 version as the recovery instance from the menu of boot options.
4. When a list of options for recovery modes were shown, selected to login as root.
5. Pressed the enter key when a prompt showed up and went to the root prompt.
6. Edited /etc/gdm3/custom.conf with "vi".
7. Removed the "#" at the front of the line #WaylandEnable=false to un-comment it. Saved the change.

Then I restarted the VM.

The login prompt came back, and I am now able to login again.


Tuesday, May 14, 2019

Eliminating International Trade Deficit Is Suicide for the US

The United States has been running international trade deficits for more than forty years. The reason that the United States let this continued for so long is that international trade deficits are needed to maintain the US dollar's status of being the international trade currency.


When any country in the world wants to buy oil from the Middle East, it needs to pay with US dollars. Where would the US dollars come from? You trade with the US using any merchandise other than US dollar, of course. Once you have the US dollars, you can then buy oil from the Middle East. Of course, you can also buy shirts from China, or cars from Japan, all in US dollars. These US dollars are not going back to the US, for sure. Because they are needed for international trade with countries other than the US. As the world economy grows bigger and bigger, more and more US dollars are needed to circulate outside of the United States. The only way that this can happen is that the US runs a bigger and bigger "trade deficit".


Notice that the US trade deficit chart agrees with the fact that starting from the early seventies, the values of exported goods as share of GDP for the entire world started to rise drastically.

Here is one interesting thing that happened in 1973 (http://www.thepeoplehistory.com/1973.html):


US exports the US dollars, just like any other merchandise. It is a commodity. No other currency has this status because no other can be used for international trade this way. Once you understand this, and you accept the fact that the US dollar is a unique commodity that can be traded like any other merchandise, you will see that US does not have an international trade imbalance after all.

What would happen if US eliminates its trade deficit, i.e., no longer exports US dollars? As the world economy grows, there will be a shortage of US dollars on the international market. Like with a shortage of anything else, two things will happen:
  1. People will look for substitutes
  2. Its price will go up before substitutes are found. After a substitute is found, its price will drop.  
When the price of the US dollar goes up, US export will suffer. If you are a US exporter (a soybean farmer for example), you will see your business shrink.

When people find substitutes, US dollar will lose its international trade currency status. US will lose all of the perks that came with it, such as the controlling power of the international banking system, for example. Then the value of the US dollar will collapse. Because once it loses the international trade currency status, it will have far less value. Its only remaining value will be for buying merchandise from the US. Then the American people will really have to work hard for it. Just imagine, if you are having a hard time when you can just print value on paper, how hard would it be when you can no longer do that?

Many countries have been seeking substitutes of the US dollar for years. Japan wants to use Japanese Yen, EU wants to use Euro, and China wants to use Chinese Yuan. None succeeded because the cost of doing business with US dollars is always cheaper.  Now with the help of Mr. Navarro, things just might tip to the side of Japan, or the side of China, or the side of EU.

Because the international trade deficits are actually balanced with the export of US dollars, there has been an influx of wealth in other commodities for the last forty some years, equal to the international trade deficits. If you have been worse off, or if you are not better off as much as you think that you should have been, you need to examine the wealth distribution system of the US in that time frame. Where did the wealth go? The cost of printing (producing) US dollars as a commodity for export should be close to zero, right? Do we really have to resort to letting Uncle Sam doing the actual importing with the dollars that it prints to be convinced of that?

If the wealth distribution system does not work right, trade or no trade, you have a problem.

Thursday, January 24, 2019

Ambulance Drivers Need to Know Better

My son is attending University of California San Diego. He almost got ran over by an ambulance in the middle of a pedestrian crossing, because the ambulance driver turned the pedestrian crossing signal to red immediately and gave himself a green light, and the driver then just drove through the crossing as if no one was there.

My son said that this was the second time that this happened to him.

While it is true that "the walk cycle can be skipped or shortened as emergency vehicles approach these intersections, in accordance with federal rules" (https://www.sun-sentinel.com/news/fl-miami-traffic-turnbell-091415-20150914-column.html), the law also says that the "drivers are required to yield to pedestrians already in a crosswalk, even if the signal has turned green." I do not know how many people know these laws, but the ambulance driver must have known. If he did not know, his employer is definitely being very negligent.

Putting someone's life at such great danger just because you are trying to save another makes no sense. I hope that the ambulance drivers in San Diego would not wait until something terrible happens to realize that. 


Saturday, December 15, 2018

Epson Workforce WF-3640 Keeps Going Offline

My Epson WF-3640 printer kept going offline, even though it was turned on, and connected to my local LAN. I could even use it to scan documents, but I just could not print with it. If I checked its status in Windows, it would show that it was offline:
Not only that, each time Epson's software updater did an update, it could not find the existing printer, so it added another copy of the Epson FAX printer.

The cause of this problem is that Epson printer driver installer installs the printer with a standard TCP/IP port. But when the printer's TCP/IP address changes, Windows will no longer be able to find the printer. You can right click on the printer, select "Printer Properties", and then go to the "Ports" tab to verify this:


I suppose that you can assign the printer a static IP address. But usually this would be too much of a hassle.

It turns out that Epson has a printer port software called "EpsonNet Print". You can google for it, or you can just go to the link http://support.epson.net/win7/updates/network/001_dl.html and download the software there. If you install the Epson printer software combo, it would probably include this as well. But because the date on the combo software is older than the printer driver, people would likely not install this software combo.

Once the EpsonNet Print software is installed, you can add a new port of the type "EpsonNet Print":


This port will work with whatever IP address the Epson printer happens to be on. You would then repeat this for the Epson WF-3640 Series (FAX) printer, and then delete all the other copies.

From here on, each time the printer is turned on, it will always be shown as "online" in Windows.


Thursday, December 13, 2018

Move Resource Group to a New Subscription on Azure Cloud

I have all of my resources in a single resource group. When I tried to move this resource group to a new subscription, I got an error saying that "Move resources specified storage account(s) yourStorageAccountName are not found with sourceSubscription..., sourceResourceGroup yourTargetResourceGroup, targetSubscription..., targetResourceGroup yourSourceResourceGroup."

It turned out that you cannot move all resources in a resource group at once if they are not in the same region. Some of my resources are in the region US West, and some are in the region US West 2.

So, I first selected all resources in the region US West 2, and moved them. After the move was done, I selected all of the remaining resources in the region US West, and moved them as well.

Everything went without any errors.


Tuesday, October 9, 2018

Upgrade Read-only Mode Databases on a SQL Server

Recently I upgraded my SQL server to SQL Server 2017. Everything went well.

But today when I tried to open a read-only mode database, I got an error:

Cannot open database 'DatabaseName' version 782. Upgrade the database to the latest version. (Microsoft SQL Server, Error: 946)

The database could not be detached. When I tried to detach it, the same error occured. I could not view the database's properties, either, because of the same error.

Nothing could be done on this read-only database, it seemed. I did not try to delete it, since I still wanted to keep the data.

Some google results suggested that the file access permissions could be the problem. Not in my case. The database files were fully accessible, both by the SQL sever process and myself.

The solution turned out to be very simple. All I needed to do was to run the following SQL script:

USE master; 
GO 
ALTER DATABASE DatabaseName
SET READ_WRITE; 
GO

When I ran this script, SQL server automatically started upgrading my database:
Converting database 'DatabaseName' from version 782 to the current version 869. Database 'DatabaseName' running the upgrade step from version 782 to version 801.
Database 'DatabaseName' running the upgrade step from version 801 to version 802.
Database 'DatabaseName' running the upgrade step from version 802 to version 803.
Database 'DatabaseName' running the upgrade step from version 803 to version 804.
Database 'DatabaseName' running the upgrade step from version 804 to version 805.
Database 'DatabaseName' running the upgrade step from version 805 to version 806.
Database 'DatabaseName' running the upgrade step from version 806 to version 807.
Database 'DatabaseName' running the upgrade step from version 807 to version 808.
Database 'DatabaseName' running the upgrade step from version 808 to version 809.
Database 'DatabaseName' running the upgrade step from version 809 to version 810.
Database 'DatabaseName' running the upgrade step from version 810 to version 811.
Database 'DatabaseName' running the upgrade step from version 811 to version 812.
Database 'DatabaseName' running the upgrade step from version 812 to version 813.
Database 'DatabaseName' running the upgrade step from version 813 to version 814.
Database 'DatabaseName' running the upgrade step from version 814 to version 815.
Database 'DatabaseName' running the upgrade step from version 815 to version 816.
Database 'DatabaseName' running the upgrade step from version 816 to version 817.
Database 'DatabaseName' running the upgrade step from version 817 to version 818.
Database 'DatabaseName' running the upgrade step from version 818 to version 819.
Database 'DatabaseName' running the upgrade step from version 819 to version 820.
Database 'DatabaseName' running the upgrade step from version 820 to version 821.
Database 'DatabaseName' running the upgrade step from version 821 to version 822.
Database 'DatabaseName' running the upgrade step from version 822 to version 823.
Database 'DatabaseName' running the upgrade step from version 823 to version 824.
Database 'DatabaseName' running the upgrade step from version 824 to version 825.
Database 'DatabaseName' running the upgrade step from version 825 to version 826.
Database 'DatabaseName' running the upgrade step from version 826 to version 827.
Database 'DatabaseName' running the upgrade step from version 827 to version 828.
Database 'DatabaseName' running the upgrade step from version 828 to version 829.
Database 'DatabaseName' running the upgrade step from version 829 to version 830.
Database 'DatabaseName' running the upgrade step from version 830 to version 831.
Database 'DatabaseName' running the upgrade step from version 831 to version 832.
Database 'DatabaseName' running the upgrade step from version 832 to version 833.
Database 'DatabaseName' running the upgrade step from version 833 to version 834.
Database 'DatabaseName' running the upgrade step from version 834 to version 835.
Database 'DatabaseName' running the upgrade step from version 835 to version 836.
Database 'DatabaseName' running the upgrade step from version 836 to version 837.
Database 'DatabaseName' running the upgrade step from version 837 to version 838.
Database 'DatabaseName' running the upgrade step from version 838 to version 839.
Database 'DatabaseName' running the upgrade step from version 839 to version 840.
Database 'DatabaseName' running the upgrade step from version 840 to version 841.
Database 'DatabaseName' running the upgrade step from version 841 to version 842.
Database 'DatabaseName' running the upgrade step from version 842 to version 843.
Database 'DatabaseName' running the upgrade step from version 843 to version 844.
Database 'DatabaseName' running the upgrade step from version 844 to version 845.
Database 'DatabaseName' running the upgrade step from version 845 to version 846.
Database 'DatabaseName' running the upgrade step from version 846 to version 847.
Database 'DatabaseName' running the upgrade step from version 847 to version 848.
Database 'DatabaseName' running the upgrade step from version 848 to version 849.
Database 'DatabaseName' running the upgrade step from version 849 to version 850.
Database 'DatabaseName' running the upgrade step from version 850 to version 851.
Database 'DatabaseName' running the upgrade step from version 851 to version 852.
Database 'DatabaseName' running the upgrade step from version 852 to version 853.
Database 'DatabaseName' running the upgrade step from version 853 to version 854.
Database 'DatabaseName' running the upgrade step from version 854 to version 855.
Database 'DatabaseName' running the upgrade step from version 855 to version 856.
Database 'DatabaseName' running the upgrade step from version 856 to version 857.
Database 'DatabaseName' running the upgrade step from version 857 to version 858.
Database 'DatabaseName' running the upgrade step from version 858 to version 859.
Database 'DatabaseName' running the upgrade step from version 859 to version 860.
Database 'DatabaseName' running the upgrade step from version 860 to version 861.
Database 'DatabaseName' running the upgrade step from version 861 to version 862.
Database 'DatabaseName' running the upgrade step from version 862 to version 863.
Database 'DatabaseName' running the upgrade step from version 863 to version 864.
Database 'DatabaseName' running the upgrade step from version 864 to version 865.
Database 'DatabaseName' running the upgrade step from version 865 to version 866.
Database 'DatabaseName' running the upgrade step from version 866 to version 867.
Database 'DatabaseName' running the upgrade step from version 867 to version 868.
Database 'DatabaseName' running the upgrade step from version 868 to version 869.
What a surprise.

Sunday, September 16, 2018

Completely Uninstall SQL Server 2016

Recently, I upgraded the development SQL database server on my workstation from SQL Server 2016 to SQL Server 2017.

After the upgrade, I tried to uninstall SQL Server 2016 from Windows Control Panel. But after the uninstall, there were still a lot of SQL Server 2016 components on my workstation. In fact, of the several SQL Server components shown in the Windows Control Panel, many would either not go away after uninstall, or would display dependency warnings and refuse to uninstall. In addition, there were many SQL Server 2016 components that were simply not shown in the Windows Control Panel.

So, I had to manually uninstall these components forcefully. First I ran a query for installed SQL Server 2016 components on the command line:

          wmic product where "name Like '%SQL%' and name like '%2016%'" get identifyingnumber,name,vendor,version > c:\temp\SQL2016Components.txt

Here the output file path "c:\temp\SQL2016Components.txt" is specific to my workstation, of course. You would need to change that to a path that is valid to your computer, obviously.

This command can take quite some to run.

After this command was completed, the contents of the output file would look like this:

IdentifyingNumber                       Name                                                                   Vendor                 Version       
{29A56A10-FEB1-4B4F-99DA-8DE4108AA1D8}  SQL Server 2016 Management Studio for Reporting Services Localization  Microsoft Corporation  13.0.16106.4  
{60B9E230-65C3-4A54-9659-1313FBC051B3}  Microsoft AS OLE DB Provider for SQL Server 2016                       Microsoft Corporation  13.0.2164.0   
{DD9B76B0-4B93-4C50-9A9E-4D1C7C3B596F}  SQL Server 2016 Management Studio                                      Microsoft Corporation  13.0.16106.4  
{8A3AE1F0-0752-435D-A01C-033BDD629C8B}  SQL Server 2016 Connection Info                                        Microsoft Corporation  13.0.14500.10 
{B9EED901-157A-4AB8-BFD1-2C6FBF5CF802}  SQL Server 2016 Common Files                                           Microsoft Corporation  13.0.1601.5   
{F8001E21-CFCC-47AD-A3B1-6B3EB6D35E48}  SQL Server 2016 Shared Management Objects                              Microsoft Corporation  13.0.14500.10 
{D3FC7A31-F127-4E2A-96F6-B24FA7D3FFAF}  SQL Server 2016 Shared Management Objects                              Microsoft Corporation  13.0.14500.10 
{1D792861-C84B-4BD0-8347-34AF40F5ACD1}  SQL Server 2016 Management Studio Extensions                           Microsoft Corporation  13.0.1601.5   
{EC234B43-728E-4CA9-8AE6-7815325D6AAD}  SQL Server 2016 Client Tools Extensions                                Microsoft Corporation  13.0.1601.5   
{59200093-D6A8-453E-B1AA-8D5E8921598A}  Microsoft SQL Server 2016 Setup (English)                              Microsoft Corporation  13.0.1601.5
   
...

From the contents of this file, I then created a batch file that looks like this:

msiexec /i {29A56A10-FEB1-4B4F-99DA-8DE4108AA1D8}
msiexec /i {60B9E230-65C3-4A54-9659-1313FBC051B3}
msiexec /i {8A3AE1F0-0752-435D-A01C-033BDD629C8B}
...

For each GUID in the output file of "wmic", I added a line "msiexec /i ..." with that GUID as the uninstall parameter.

Then I ran this batch file from the command line. 

I was getting prompted on each line of the batch file:


I selected "Yes" each time. On some steps, I was getting error popups:


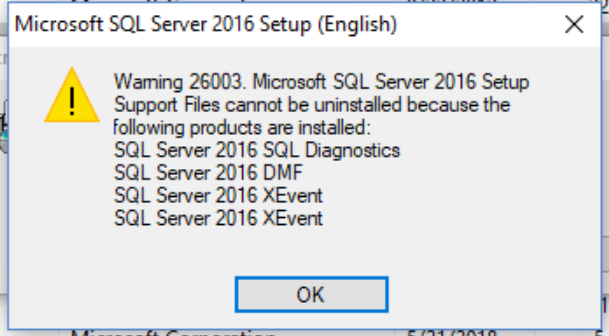
On some other steps, I was getting warning popups like this:


But I continued with the batch file.

I repeated the batch file three times. On the third pass, none of the components remained. SQL Server 2016 was completely uninstalled.

To make sure that the new SQL Server 2017 installation has all the components intact, I ran SQL Server 2017 Setup, checked all of the features that I wanted. The SQL Server 2017 Setup has some problems (http://programount.blogspot.com/2018/06/sql-server-2017-installation-errors-on.html), but once patched, everything works fine.

Thursday, August 30, 2018

IIS, Self-Signed Certificate, and Chrome

Recently, I needed to set up an IIS server for development. I installed a self-signed certificate on the IIS server, since it is never going to be public facing.

It turned out to be a lot of trouble to get the self-signed certificate to work with Chrome.

First I created a domain certificate from the IIS manager. I exported the certificate and installed it on developer workstations' trusted root certificate store. That seemed to work with Internet Explorer and Edge. But it did not work with Chrome.

I read online that Chrome now requires a "Subject Alternative Name".  The IIS manager generated domain certificate did not have a "Subject Alternative Name". Apparently Microsoft's "makecert" does not generate certificates with "Subject Alternative Name" either. So I used the Power Shell command "New-SelfSignedCertificate" and generated a self-signed certificate with "Subject Alternative Name".

That still did not work with Chrome. Chrome's development tool says everything is okay, but the page is not secure (ERR_SPDY_INADEQUATE_TRANSPORT_SECURITY):


These self-contradicting results from Chrome is definitely not helpful to me for solving the problem.

I downloaded IIS Crypto (https://www.nartac.com/Products/IISCrypto/). It suggested a bunch of changes for "Best Practice". I made the changes as suggested, and rebooted the server.

Now Chrome is showing the page without any warnings on the certificate.

This is surprising to me because the server is a new installation of Windows Server 2016. Somehow the out-of-the box settings of IIS on such a server is considered insufficient to Chrome.